Plate heat exchangers are extremely efficient and can be workhorses in many different types of environments. But, knowing what to watch for when inspecting and maintaining your plate heat exchanger is critical. We’ll explore five common questions and answers to help you take better care of your plate heat exchanger.
1. How can I tell if my gaskets are glued or utilize a glueless style attachment method?
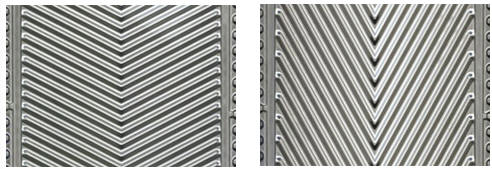
There are two (2) main types of attachment methods for gaskets on plate heat exchangers. Viewing the plate pack from the side during operation can give you insight into the attachment method used. First, let’s explore the glued type of gaskets. The glue used for the gaskets comes in two (2) main types: rubber based and epoxy adhesives. Rubber type adhesives are designed to essentially hold the gaskets in place while the units are tightened. In lower temperature duties, this glue may be able to hold a firm bond over time. In higher temperature environments, this style adhesive will likely require repair when the unit is opened. Epoxy style glue is meant to perform as a far more permanent bond for duties where the heat exchanger may need to be opened frequently for cleaning. Rubber based adhesives can be field removed for a gasket change out (although it isn’t generally recommended for an entire plate pack) while gaskets applied with epoxy adhesives usually have to be frozen off with liquid nitrogen in order to change the gaskets. So, if you’ve determined that your heat exchanger has glued gaskets, it’s important to determine which type of adhesive was used. Glueless systems utilize a physical attachment method to hold the gaskets onto the plates. There are three (3) types of common glueless attachment systems: clip-on, snap-in, and “push” on. Viewing the the side of the plate pack, a clip on style gaskets will present like this:
Notice the clips that “grab” onto the edge of the plates. These are easy to spot. These type of gaskets are favored on newer model plate heat exchangers. The snap-in style gasket looks a little different:
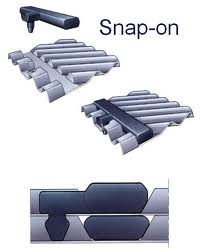
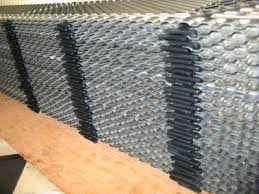
Notice how the plate has small holes punched near the edge and the gasket has a small nipple that passes through the hole for attachment. This method was utilized more on older plate heat exchangers. In a photo presented below in Question #2, you can see a side view of this type of gasket. There is a third variety that we refer to as “push” on. Push on gaskets have various crimped area around the gasket groove and the gaskets are “pushed” into the crimps to hold the gasket in place. This type of gasket attachment is difficult to work with and isn’t as widely used as the others. Also, these gaskets will present just like glued gaskets from a side view of the plate pack.
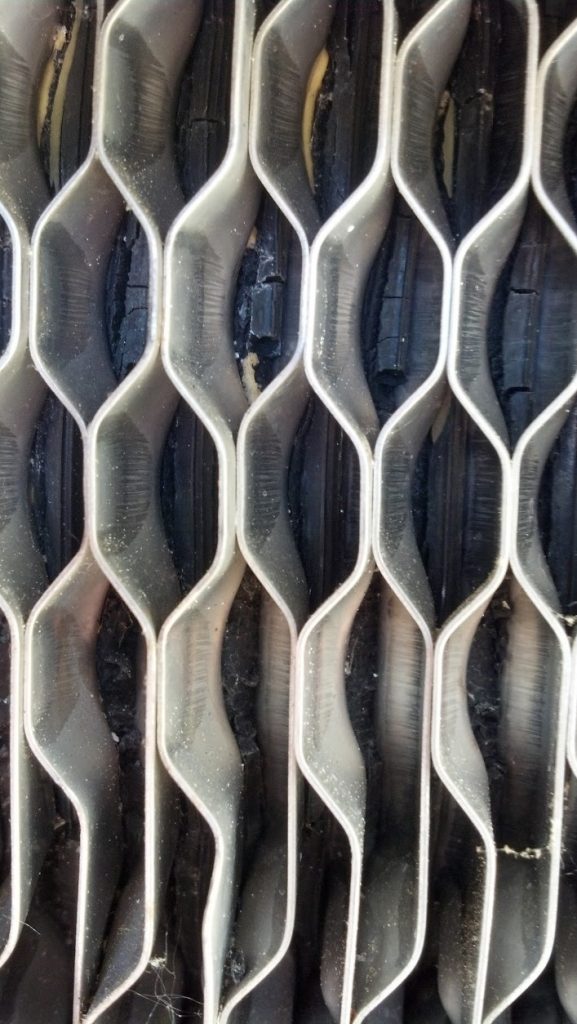
2. Why are my plates crooked when I hang them in the heat exchanger?
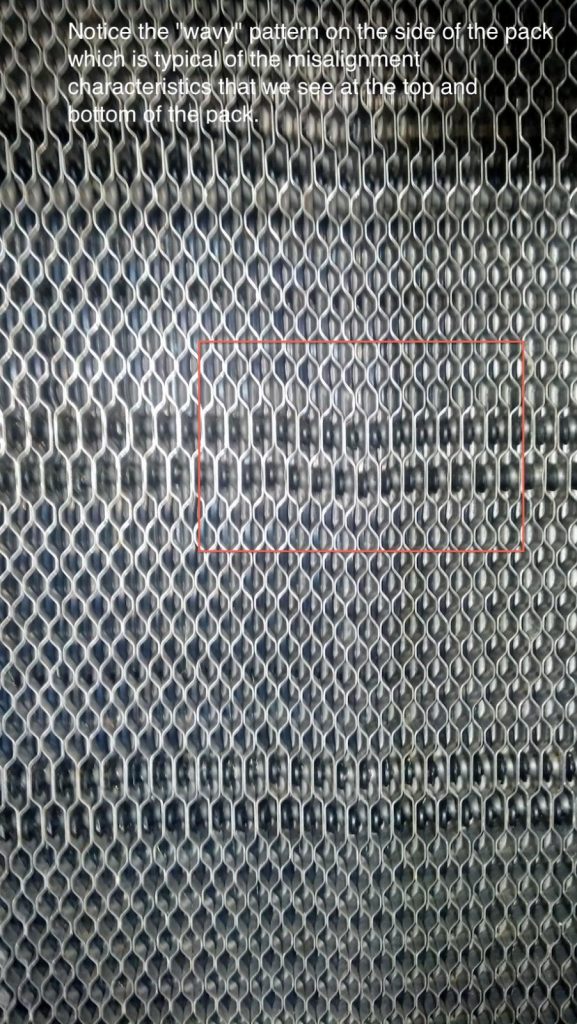
Remember, it’s the thin plates inside your heat plate exchanger that make it work so well. Typically, these plates range in thickness from 0.40 mm to 0.60 mm (although they can be thicker). Some manufacturers will reinforce the areas of the plates where they contact the upper and lower bars in the heat exchanger. If these areas are NOT reinforced, the plates can bend in these areas and cause serious misalignment issues. Here is a view of the hanger areas of some plates that have been seriously compromised:

Without proper alignment at the top and bottom, the plates are able to move from side to side and up and down during the tightening process. This results in gaskets misalignment and often times leaks:
If you notice any of your hanger areas are bent, try to straighten them as best you can before reinstalling your plates back into your unit. To avoid bending your hanger area, it’s always a good idea to use a lubricate compatible with your process on the top and bottom bars when removing or inserting plates into your heat exchanger.
3. How can I tell if my plates have holes in them?
This is a common question that we receive. While some folks have constant process measurements that would immediately notify them of a cross contamination, in other applications, the engineer may not be aware that the hot and cold fluids are mixing. If you suspect that your plate heat exchanger may be leaking hot fluid into the cold circuit or vice versa, there is a relatively simply way to find out. Isolate and drain either the hot or cold circuit on the plate heat exchanger. After this circuit is drained, if the drain is nearby the bottom piping leaving the heat exchanger, simply leave the drain open. If the drain is far away from the heat exchanger or if you have a spool installed on the bottom of the drained circuit, you could just remove the spool for visual access. Now pressurize the opposite side and watch the drain or look into the open port at the bottom of the heat exchanger. If you see process fluid, you’ll know that at least some of your plates have holes in them and it’s likely that all of your plates have reached the end of their useful service life.
4. What is the difference between fouling and scaling?
This is a common point of confusion for plate heat exchanger owners. Fouling is a term typically used to refer to physical build up on the plates that can be easily hydroblasted or brushed off the plate surface. The most common source of fouling is biological growth from a cooling tower. Scaling is the term typically used to refer to a hard mineral build up on the surface of the plates that usually has to be removed via chemical cleaning of the plates. The most common culprits are calcium-based salts at elevated temperature. We actually addressed this topic in detail in another article which you can find here:
Heat Exchanger Fouling and Scaling
5. What should I do to monitor the overall health of my plate heat exchanger?
First, it’s important to have a baseline performance from when your unit is either brand new or freshly cleaned. Don’t rely on the design datasheet from the factory. Variances in flows and temperature from design to operation are a virtual certainty. If you don’t have temperature and pressure gauges on the inlets and outlets of your plate heat exchanger, install them during the next outage. Record these reading when your plate heat exchanger is at a known clean stage and you’re operating at a point where you expect to run most of the time.
Now, you can monitor your plate heat exchanger for variances from these baseline readings. Any increase in pressure drop or loss of heat transfer can indicate that your heat exchanger may need cleaned.
Also, at least once a year, inspect the side of the plate pack and look under the unit for any leaks. Inspecting the sides of the gaskets can help you catch cracks that are developing due to oxidation before they become a problem.
These gaskets are very near the end of their lifetime. A quick inspection shows us this and we can plan for it during the next outage.