Plate heat exchangers can supply reliable operating service for years with proper maintenance, but what about when something goes wrong? Is your plate heat exchanger leaking? Is the leak slow or fast? How can you know what the problem is and the best way to address it. We’ll review some of the basics to help you troubleshoot problems with gaskets or the maintenance condition of your plate exchanger.
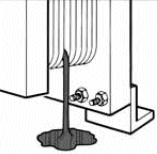
External leaks in a plate heat exchanger can generally be classified into one of two (2) categories: end plate to frame plate leaks and channel plate leaks. We discussed end plate to frame leakage in our article entitled “Plate Heat Exchanger Frame Corrosion“. The second type of leakage, channel plate leakage, can have different causes and solutions. Channel plate leakage will occur within the body of the plate pack rather than near the frame plate of the heat exchanger as shown in Figure 1.
Channel plate leaks can be further classified into “general” leaks or “isolated” leaks. Generally speaking, if you find an area of your plate pack spanning more than one plate which is leaking badly or weeping externally, this is a “general” leak. Alternatively, if you have a single gasket failure causing a single leak point and all of the other gaskets appear to be properly sealed, we refer to this as an “isolated” leak.
We’ll address each type of plate pack leak separately to find the cause as quickly as possible.
Troubleshooting a “General Leak”
The very first step in evaluating a “general” leak on your plate heat exchanger is to assess the age of the gaskets. While the following are not meant to serve as strict rules, they will give you some feel for whether or not your gaskets may simply be at the end of their service life:
NBR or Nitrile gaskets operating above 200 °F should last 2-3 years. Between 150°F and 200 °F, they may last 3-5 years. Below 150 °F, Nitrile gaskets should last in excess of 5 years.
EPDM gaskets operating above 300 °F should last 4-6 years. Between 250 °F and 300 °F, they may last 6-8 years. Between 200 °F and 250 °F, EPDM may last 8-10 years. Below 200 °F, EPDM gaskets should last in excess of 10 years.
Fluoropolymer type gaskets will generally be somewhere in between EPDM and Nitrile in life and operating temperature. If your process duty could use either Nitrile or EPDM gaskets (water to water duties for example), always choice EPDM. The additional cost is virtually negligible and you’ll get better service life as you can see from the above.
At this point, even if you’ve determined that your gaskets may be nearing the end of their service life, you should check the A or tightening dimension of your plate pack. If the plate pack is not properly tightened, the gaskets will have no opportunity to seal properly. If the plate pack is not tightened to the proper dimension at the top, bottom, and center of the plate pack, make the appropriate adjustments.
DO NOT, HOWEVER, TIGHTEN THE PLATE PACK PAST THE MANUFACTURER’S RECOMMENDED DIMENSION IN AN EFFORT TO STOP THE LEAKING
Overtightening a plate heat exchanger can cause damage to the plates. If your heat exchanger is properly tightened and still experiencing general leakage, it’s time for additional steps.
Look at the top and bottom of the heat exchanger and look for any misaligned plates or damage to the hanger areas. Over time, through handling, the hanger can become bent and cause misalignment in the gasket sealing area. If you notice some misalignment, evaluate whether or not this misalignment corresponds to the areas of the plate pack where the leaks are occurring. If so, this may be the cause of the problem. During the next shut down, remove these plates and try to fix the damaged area. If the plate alignment cannot be fixed, there are two (2) options: remove the plates and put the unit back together, or replace the plates with new plates.
Pattern vs. Plate Hung
Improperly
It’s important to note that you will lose heat transfer area and increase the pressure loss through the unit by removing plates. However, if you’re removing five (5) plates from a unit with 200 plates, the impact will be minimal. However, if you’re removing over 10% of the plates in the pack, the process may be impacted adversely.
If new plates are needed, take a moment to consider replacing all of the gaskets in the heat exchanger as well, especially if the gaskets may be reaching the end of their service life.
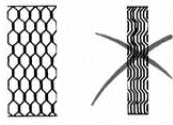
If, upon examination, no alignment problems are visible, then examine the plate pack for proper hanging of the plates. Most plate heat exchangers should have a consistent “honeycomb” pattern throughout as shown in Figure 2. If some plates are found to be hung improperly, schedule the unit to be fixed during the next outage.
If you’ve followed these steps and still haven’t found the problem, it’s time to schedule the unit to be taken apart at the next outage. Remove the plates from the heat exchanger and look for any signs of corrosion under the gaskets. Examine the gaskets themselves. Do the gasket appear brittle or show cracks when bent? If so, they need replaced and that may be the simply answer to your leakage problem.
If the gaskets appears to be in good condition, examine the plates further and look for signs of deformation. Again, carefully examine the hangers as well. Physically count the plates and confirm the proper tightening dimension of the unit. Over time, plates are sometimes added or removed and the original tightening dimension may no longer be correct.
Troubleshooting an “Isolated Leak”
If you’re problem is a single (or a couple) isolated leaks at very specific gasket locations on the plate pack, we approach the troubleshooting a little differently. In this scenario, we start by checking for the consistent honeycomb pattern as shown in Figure 2. This is the most common cause of an isolated leak in plate exchangers. You in the leak areas for a plate may be hung incorrectly in the unit. The simple fix is to remove this plate and reinstall it correctly in the heat exchanger. Notice that you may have to swap a plate from another location in the pack to avoid having to rotate additional plates in the heat exchanger.
If the plates are hung correctly, take a close look in the leakage area and see if you notice a “pinched” gasket or a gasket that has come out of the gasket groove. Sometimes, this can be quickly repair by loosening the unit and pushing the gasket back into the groove. While the unit is loose, look for any other gaskets that may be pinched out as well. Gaskets can be installed in a pinched position and not leak for some time. Also, pressure surges can also cause gaskets to unseat from their sealing area as well.
If the plates are hung properly and no gaskets appear to be pinched, the begin checking the vertical alignment of the plates near the leak site. Are these plates sitting a little higher or lower than the surrounding plates. This could be the cause of the leak and can be addressed as described earlier.
Beyond these steps, we recommend removing the plate or plates causing the problems (or install new gaskets on the plates) and putting the unit back together. The root cause in these cases could be a quality problem with one or more of the gaskets or a simply physical defect or damage to the gasket. Perhaps the gasket has a hole in it or was cut or punctured from the outside.
Conclusion
A leaking plate heat exchange is never a welcomed sight, but by diagnosing the problem and following these steps, you can find the problem and have it fixed in record time. If you need assistance in troubleshooting your plate heat exchanger or have a question, please email us below or call (804) 370-3855.